 Today I'm wearing a couple pieces of jewelry that I made myself, & this reminded me that jewelry making is just a few steps advanced from repairing jewelry. And learning to repair your jewelry is a handy skill to have, so I thought I'd share a few tips...
The most common jewelry break that I've found is a pendant falling off a chain or an earring piece coming off the ear wire. What happens is that a jump ring (a small metal ring that has a break in it) that connects the pendant or earring to the chain or wire comes apart. The ring usually falls away & gets lost.
To make this repair, you'll need a tool called needle-nose pliers. These are not very expensive (under $10) & can be found at hardware stores & craft stores. You'll also need a new jump ring, which is not expensive either. Jump rings are sold in bags of 10 or more at craft stores & online at places like Fire Mountain Gems. They come in different metals & all kinds of sizes -- pick whatever matches the jewelry you're repairing. I find it's handy to have a bag of 7.5mm silver jump rings around for future repairs.
Take a jump ring & hold it between your forefinger & thumb of one hand. Hold the pliers in your other hand, & use the pliers to gently pry open the jump ring at its break. You don't need to open it too much.
Pro tip: You can get two needle-nose pliers, & hold the jump ring in the tip of one pliers & then open the ring with the other. If you plan to make your own jewelry, you'll want to master this technique, but it's not necessary for occasional repairs.
While you have the jump ring open, hook your pendant or earring onto the ring. Then hook the jump ring onto the chain or ear wire. Now, use the pliers to carefully close the jump ring back into a complete circle by pressing on the sides of the ring. You may need to press around the different sides of the ring to keep the circle nice & round while also getting that break in the ring completely closed & flat.
That's essentially it. You can start making jewelry by doing this same thing & add different pendants to chains or velvet ribbons or put charms on ear wires to make new earrings. That's the simplest form of jewelry making, but it yields tons of possibilities. You can scavenge through old, broken jewelry, or buy new charms & pendants to assemble into different combinations. Go wild!

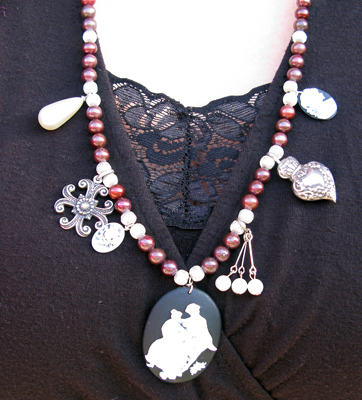
Black knit dress, Target | Burgundy peplum sweater, Anthropologie, gift from Sarah | Black tights, Calvin Klein | Black buckle boots, Aldo | Burgundy & silver charm necklace, made by me | Pewter key earrings, made by me | Silver & garnet ring, bought in Jaipur, India | Black knit headband, random accessory store
Do you repair or make your own jewelry? Are you interested in trying?
I <3 Fire Mountain Gems!!!
ReplyDeleteOhhhh! I've been "making" my own jewelry too! I've been taking broken rosary beads and adding pendants onto the beads or making the crucifix's into earrings. We are on the same brainwave of jewelry scavenging :)
ReplyDeleteOmg, how much do I buy from them?!?
ReplyDeleteAwesome! I have a couple boxes of findings & parts & pieces that I make into new stuff. Such fun :)
ReplyDeleteGreat tips! I've been lurking here for a little while and love your style, but this entry just begs for a comment from this hobbyist silversmith.
ReplyDeleteWhen you open a jump ring, don't stretch it into an oval shape; as you've no doubt discovered, it's a huge pain to get it back to being perfectly round, and the tips often gap or sit at odd angles instead of lining up nicely. Gaps in the ring can drop your charms or lose your pendants, which is a shame when you've spent SO much time finding (or making) just the right one.
Instead, twist the ring side to side, so that the tips of the wire are offset, but it still makes a perfect circle when you look at its profile. Then when you want to close it, gently align the tips again, and tada! You end up with rings that don't gap, and won't let go your pendants as easily.
You don't want the tips to look like this when opened: -- --
But instead to look like this: _--
Then when you close it, you should hardly even be able to see the gap.
If you have something very heavy, you can also put two jump rings side-by-side instead of one. There's no rule that says you can only have one connector per piece.
I'm leaning more and more toward wearing a more formal, Victorian-inspired style at work myself, so you are an inspiration to me. Thanks for your lovely photos and tips!
Definitely good tips! I should have included pictures, but I'd need an assistant, darnit. I just wanted to get across that it's not too hard to make repairs -- I see so much broken jewelry thrown away (ok, cool for me to use, but not cool for the ppl who tossed it out ;-). Making little repairs was what got me started making whole pieces from scratch.
ReplyDeleteAh, I see where you're coming from. n_n Thanks for letting me ramble in your comments, then!
ReplyDeleteI came from the same place - doing simple jump-ring repairs turned into an entire hobby in lapidary and silversmithing!
There are people who are fond of doing DIY projects such as jewelry repair. They will surely be thrilled to note this helpful tips that you have shared regarding jewelry repair. Thanks for sharing.
ReplyDelete